
back to the blog
Guide 2: Motorcycle Controls and Overview

James B · December 18, 2018
The first part of your CBT training is an introduction to the controls used whilst riding a motorcycle or scooter. It is good for you to familiarise yourself with this before you attend the training session.
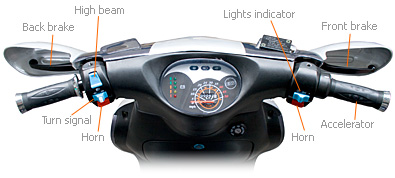
This diagram shows the basic controls found on a modern day scooter.
Left Handlebar controls
High Beam - These buttons are found on a control panel next to your left handlebar operated by your left thumb. These are used to switch between full and dipped beams. Note that the light on modern motorcycles/scooters are always turned on automatically for safety reasons.
Horns - The horn button is usually located on the same control panel as the high beam. Use this to warn other drivers on the road in unexpected circumstances where you cannot be seen or in poor visibility conditions.
Turn signal (Indicators) - The turn signal is usually found on the same side. Indicate to signal to other drivers that you intend to turn or change directions.
Clutch lever (manual motorcycles only) - The clutch lever is found in front of your left handle bar. You must use the clutch to : select or change gears including going into neutral in addition to engaging it for slow speed manoeuvres. On an automatic scooter this lever is the rear brake.
Choke (on certain motorcycles only) - The choke is a button found between the left hand bar and the clutch levers. It is a useful device to have on your motorcycle when starting a cold engine as it changes the amount of air which the engine burns with the fuel mixture.
Right handlebar controls
Engine cut out switch - This is usually a red button right next to the right handlebars. It acts as a kill switch for your motorcycles engine and electrical circuits in the event of an emergency such as a crash to prevent the risk of fire.
Electric starter - This button is usually located on the right handlebar and is used to start the motorcycle.
Front brake lever - This lever is found right above the right side handlebar and applies the front brake. To use the brake, squeeze the lever closer to you.
Accelerator - Your right handle acts as the accelerator. This controls the engine speeds when you rotate the handle towards you. The fuel that is funnelled through this rotating either slows down or speeds up your motorcycle.
Manual Motorcycle Controls
Foot controls
Gear selector - The gear selector is found in front of your left foot rest. Change gears using this and the clutch to match the engine power of your motorcycle with the speeds you are travelling on the road.
Rear brake pedal - The rear brake pedal is found in front of your right foot rest and operates the rear brake.
Kick start lever - This lever is found above the foot peg. To start the bike It must be pushed down hard which gets the piston moving and fires up the engine.

Instruments Panel
Speedometer - This shows the speeds your motorcycle is travelling in miles or kilometres per hour.
Trip meter - This records the distance travelled in one trip if reset to zero before the start of the trip.
Ignition light - This comes on when the ignition is switched on and should go off when the engine is running.
Neutral light - This shows that your gears are in neutral position.
Rev counter - This shows engine speeds in revolutions per minute [RPM]
Indicator repeater - This shows that your indicators are in use.
High beam light - This shows that your high beams are in use.
Ignition switch - This switch is operated by the ignition key. There are three main positions – off, on and lock.
Fuel Level - Shows how much fuel is inside the tank. Ensure the bike is on flat ground for an accurate reading.
The motorcycle stands
Centre stand - To position your motorcycle using a centre stand, stand on the left side of your motorcycle holding your left handlebar. Then with your right foot, push the stand down while holding the saddle at the rear of your motorcycle with your right hand. Keep holding the stand down with your foot then push your motorcycle backwards and upwards. Your motorcycle is now positioned on the centre stand.

Side stand - The side stand is much easier to use compared to the centre stand however you must ensure that the ground the stand is leaning on is firm and stable. To position your motorcycle on the side stand, stand on the left side of your motorcycle while holding the left handlebar. Then push the side stand down with your left foot while allowing the weight of the motorcycle to lean on you until the motorcycle is stable on the stand. You should put the bike on this stand before you dismount the bike

Starting, stopping and dismounting from your motorcycle.
Starting the engine
- Ensure that your gear is in neutral mode.
- Turn on the fuel tap (if your motorcycle has one.)
- If your motorcycle has a choke, ensure that it is turned on or pulled all the way out. This is only necessary if you are starting a cold engine.
- If the key has already been inserted in the ignition - turn it on.
- Make sure the kill switch of the motorcycle is set to run.
- If you're on a motorcycle, squeeze the clutch lever with your left hand all the way to the grip. If you're on a scooter, hold the rear brake instead.
- The next steps depend on whether your motorcycle has a kick starter or an electric starter:
Kick starter (manual motorcycle)
Pull out the kick starter lever. Then place your right foot on the kick starter lever and firmly push down. If hard to start, repeat this step otherwise position your motorcycle on the side stand and use your body weight to kick start.
Electric starter
Press and release the starter button once the engine starts. You may need to apply throttle to give it some engine speed. Turn the choke off once the engine starts.
Stopping the engine
- Close the throttle
- Put your gear into neutral
- Turn the ignition off and take the keys with you
- Turn the fuel tap off
Dismounting from the motorcycle
You will be taught during your CBT and have to demonstrate how to safely dismount from your bike. It will involve being asked to bring the bike to a controlled stop using the brakes, putting the bike on the stand (if a motorcycle) and dismounting. You’ll also practice manoeuvring the bike whilst dismounted, using the handlebars and seat rail to control the bike as you walk.
NEXT: Guide 3 Road Signs
OR how about try our new online CBT Quiz: RideTo: Learn which has just gone live in Beta testing.