
back to the blog
How To Pass The Full Motorcycle Licence Tests

Tony W · February 12, 2025
You've just clicked the button on the RideTo site to confirm your motorcycle full licence course is booked. No doubt you're excited and maybe a little bit nervous thinking about the whole process?
So let's guide you through what to expect and give you some handy tips to help you sail through both parts of the motorcycle test.
The full motorcycle licence test consists of two sections, known as Module 1 (Mod 1) which takes place in a controlled area with an examiner on foot, and Module 2 (Mod 2) which takes place on the open road with an examiner following you on a motorcycle.
Prerequisites To Being Able To Pass The Full Motorcycle Test
To be able to take (and pass!) your motorcycle test, you'll need to have:
- A driver's licence (UK driving, UK provisional or EU licence with UK counterpart licence number)
- A valid CBT certificate
- A valid motorcycle theory test certificate
The tests are conducted in English, so you'll also need to be able to speak and understand English to a reasonable standard. The instructors can't safely direct you on the road, or teach you during training, if they can't communicate with you.
You'll also need to be able to read a registration plate 20.5 metres away. It's fine to wear glasses to allow you to be able to manage this — as long as you bring them during the tests!
Preparation To Pass The Motorcycle Tests
The single best way to boost your chances of passing first time is to get plenty of high-quality training.
Paying for your motorcycle licence training usually includes both the training, and the modules. But, you may just want to do some initial training without the pressure of having to take your Mod 1 and Mod 2 yet as an alternative.
RideTo offers Training Packages for full licences (A1, A2 or A) and the right package for you will depend on your riding experience:
- Introduction, Foundations, & Skill Assessment | 2 Sessions: Ideal for less confident riders or those with minimal experience who are seeking instructor assessment to continue learning
- Fast-track Course For Very Experienced Riders | 3 Sessions: Designed for confident riders with extensive experience riding manual motorcycles on UK roads
- Short Course For Experienced Riders | 4 Sessions: Designed for riders who have experience riding manual motorcycles on UK roads
- Full Course For CBT Riders | 5 Sessions: Our most popular course — designed to provide full training and test preparation to riders with any level of experience riding with a CBT licence on UK roads
Making sure you get enough training relative to your confidence, experience, and licence level is what will set you up for success when it comes to passing the full motorcycle test.
In terms of homework — you'll need to know the rules of the road like the back of your hand. With a bigger bike comes bigger responsibility, and knowing how to keep yourself and others safe on the road is paramount. Make sure you study up on the highway code, riding skills and theory.
Not sure where to start? Check out the RideTo Store's Learner Rider Books.
Ready to get started? Find your nearest A1, A2 or full A licence training with RideTo.
FIND A COURSEModule 1 Motorcycle Test: The Exercises and How To Pass Them
Upon arrival at the test centre your details will be confirmed — don't forget your required documents: driving licence, theory test certificate and your CBT certificate. There will be a short period of sitting with sweaty palms until the examiner calls your name and you head out to the bike, whilst they open the gate of the Motorcycle Manoeuvring Area (MMA) and ask you to wheel your bike in.
Quick Tip: As soon as you pass through the gate you are effectively 'on the road' and under examination, so act accordingly. Observation is the key here — even though it may feel a bit over the top, ensure you do your observations and shoulder checks even when off the bike. Treat the MMA pad as an active busy road.
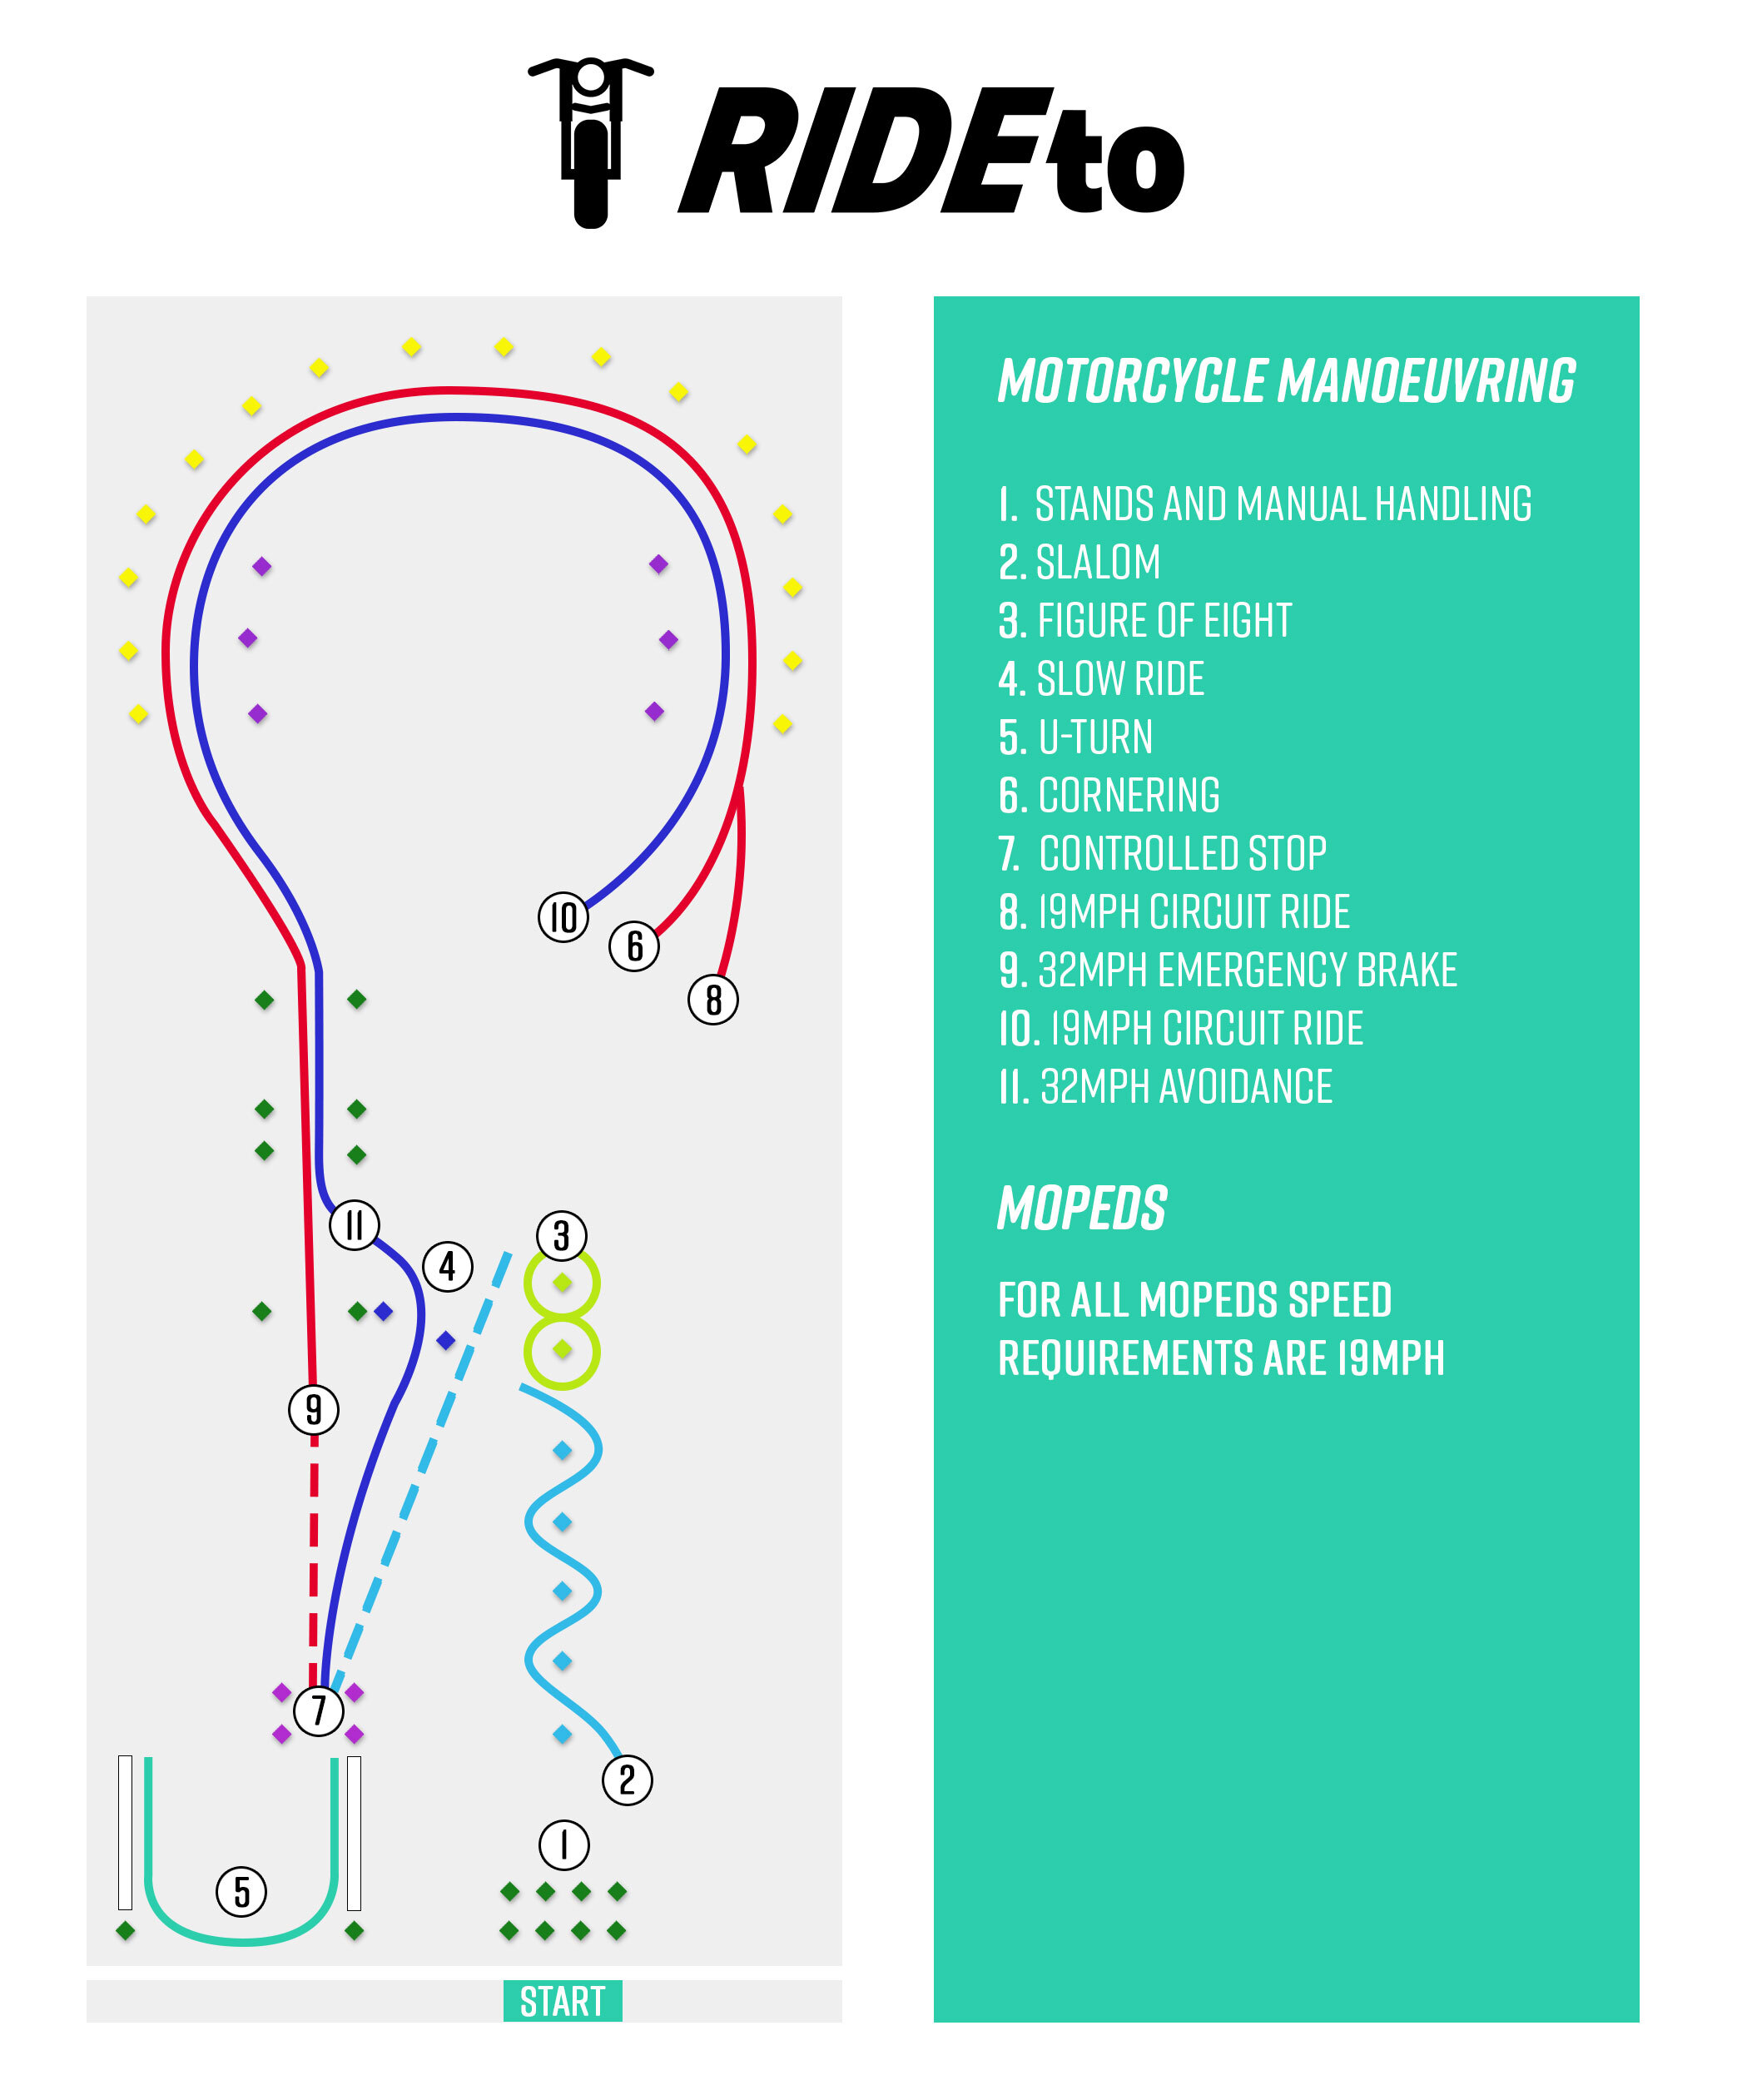
Exercise 1
You will be asked to wheel your moped or motorcycle into a parking space and place it on the side stand. Remember your observations — they are very very important.
Exercise 2
Once happy the examiner will ask you to mount your vehicle and start the engine ready to attempt the slalom test. You must manoeuvre between five cones placed 4.5m apart at a suitable pace. We can't stress this enough… do your observations. Failing to do a shoulder check before you pull away will be marked as an error.
Exercise 3
You will be asked to complete a number of figure eight manoeuvres around two cones placed 6m apart. Remember… observations!
Exercise 4
Next up will be a slow ride from the figure of eight cones to the U-turn test area. This is to demonstrate your slow control of the bike. The rear brake is very useful during this section as your instructor would have taught you. Do we need to remind you again about observations?
Exercise 5
The U turn is designed to simulate turning 180 degrees on a road. There will be two white lines on the ground 7.5m apart. The key to this turn is where you look. Pick your point to start the turn, then look over your shoulder at the point you want to get to — the bike will follow you around. Don't look at the ground or just in front of your wheel, you won't make it. Don't cross the line or put your foot down and you'll get through with no errors. Shoulder check!
Exercise 6
Cornering next and you'll be asked to ride through a series of cones placed out to simulate a corner (circuit). It could be a right or left hand bend depending on how the MMA pad is configured.
Exercise 7
You'll be asked to ride around the circuit in the opposite direction and come to a controlled stop with your front wheel inside an area marked by four cones.
Exercise 8
Another ride back around the circuit, this time at a constant 19mph.
Exercise 9
The circuit is reversed again but at 32mph with an emergency braking exercise using the same four cones as the controlled stop.
Exercise 10
Back round the circuit at 19mph to get ready for the final exercise. And remember — shoulder checks before you pull away, every time!
Exercise 11
Probably the most feared exercise, the avoidance test — but in reality it's nothing to worry about. You will be asked to ride the circuit a final time and on the straight there will be two blue cones offset to one side. Yellow cones mark the point at which you must deviate across and through the blue cones, then bring the bike to a stop in a controlled manner. You must be travelling through the cones at 32mph at the point of avoidance. If you don't meet the speed the examiner will point this out and give you another chance.
That's it, that's the test complete and the examiner will instruct you to ride out of the pad. It's very easy at this point to forget those observations, and many students have picked up errors for not making a shoulder check when pulling out at the end of the test!
You get your result on the spot and as long as you have less than 5 riding faults (minors) and no serious faults (majors) you have your Mod 1 in the bag. The examiner will issue you a certificate, which you need to present at your Mod 2 test.
Module 2 Motorcycle Test: How To Pass The Road Portion
At The Test Centre
The Mod 2 test starts away from the bike at the test centre with an eyesight check. The examiner will ask you to read a number plate at a distance of 20 metres. Fail this and the test is over!
Next are the 'show me, tell me' questions where the examiner will ask two questions to test that you know how to carry out basic safety checks of your motorcycle. Your instructor will take you through the common questions during your lessons.
On The Road
Then it's time to mount up, check that the examiner intercom is working (one way only — examiner to rider) and head out on the test route. The examiner will follow and give you directional instructions over the radio whilst you ride in a variety of road and traffic conditions.
There are a number of tasks the examiner will ask you to perform which include normal stops, an angle start (pulling out from behind a parked car) and a hill start if the route permits.
After 15-20 minutes of riding under direction you will switch to 'Independent Riding'. For the next 10 minutes or so the examiner will remain silent as you ride on a route of your choice, following road signs to a location the examiner has said to follow.
This part of the test is intended to confirm that you are able to ride safely making your own decisions. When the examiner has seen enough they will direct you back to the test centre to review your results.
During the test the examiner will have made mental notes of any 'dangerous', 'serious' or 'riding' faults and once back at the test centre they will sit down with you and go through any of these that were noted.
If you have no serious faults (majors) and less than 10 riding faults (minors) you have passed and the examiner will issue your certificate.
They will also ask if you would like your full licence to automatically be sent to you — usually the easiest option. If so, just hand them your existing driving licence and a new full licence will arrive in the post in a few days.
The best feeling in the world comes shortly after, when you can remove the L plates from your bike and ride back to the training school to celebrate with your instructor!
And if you haven't already done so, now's the time to head over to the RideTo Store and kit yourself out for life on two wheels.
Ready to ditch the L-plates for good? Find full licence training near you and ride without restrictions.
SEARCH FULL LICENCES